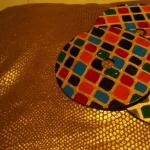
What can be made from computer disks. CD pendants
The invention of the compact disc was a breakthrough in the music industry. They made it possible to preserve sound in a revolutionary new quality. Therefore, every music lover considered it his duty to collect an impressive collection of records. But technology does not stand still, and today we have access to more convenient media. However, don't throw the discs into the scrap yard - they can be used in unexpected ways.
Make coasters for glasses
To prevent a glass of juice or water from leaving wet spots on the table, you can place it on a napkin. It’s better to make decorative stands using your favorite discs. To do this, you need to paint the top of the disk with acrylic paint or make an applique. Use textile glue and any fabric with a non-fraying edge.

Lay out a mirror mosaic
Cut the disks into small pieces. The most convenient way to do this is with garden shears. If there are none, you can try to break them. Choose any surface you want to decorate and cover it with glue. Ceramic tile adhesive works well. After the mosaic has dried, fill the gaps between the shards with tile grout. Mosaic is perfect for decorating tables, cabinets or creating panels.

Use the mirror surface of the disc as a frame
Place children's photos and drawings in a mirror frame. Decorate your child’s workplace with this decor. Now the room will become brighter and more interesting, and the child’s creative experiments will not be lost in a pile of garbage.

Option for advanced
If you are confident in your skills, have time resources and a large supply of disks, feel free to start creating animals in 3D technology. Use drywall and foam as a base. Such animals will be an excellent decoration for the garden and will scare away uninvited birds.

Glue the pincushion onto the disk
Needles and pins are very easy to lose. And they are sometimes found by accident, and not always in a safe way. Due to its small size, an ordinary pincushion can get lost. Increase its area by gluing a bright, noticeable detail. You can use a simple pompom as a pillow. Now everything sharp and dangerous will be in its place.

Build a clock of incredible size
Most inexpensive watches can operate without their original dial. Remove everything unnecessary, leaving only the mechanism, hands and batteries. And make the dial from a large number of old disks attached to a sheet of plywood or thick cardboard. The numbers can be painted with acrylic paint or glued on ready-made ones (use children's counting material). Add any decor, such as glass hemispheres from a craft store. This clock will become a highlight of your home.

Make a jewelry box
It doesn’t matter what exactly you consider to be your treasure - jewelry or a collection of homemade jewelry, the most precious thing needs a decent frame. Make a shiny box by gluing pieces of disks over an ordinary cardboard box.

Replace tiles with discs
Using the same principle that you can use to decorate a table or cabinet, you can cover an entire wall. An excellent option for the kitchen, bathroom or balcony. You will only have to spend money on tile adhesive and fugue. And you can ask all your friends for free CDs for the project.

Make decorations for the Christmas tree
Sleighs are prepared in the summer, and new Christmas tree decorations can be made at any time of the year. Cover foam and glass balls, or toys with peeling paint with disc fragments. Now the tree will shine without compromising your budget.

Decorate your clothes
Large necklaces and collars have been popular for several seasons now. Supplement the finished inexpensive product with fragments of CDs, and it will sparkle with new colors. You can do without a necklace and decorate the collar or cuffs with mirror pieces. In this case, cut the disk into smaller pieces.

Build a big lamp
The mirror surface of the disk perfectly reflects light. For this project, choose discs that don't have a lot of pattern and have a clear center section. This lamp will create beautiful shadows on the walls. An excellent option for decorating a room for a music lover or teenager.

Make curtain ties
Classic curtains can be secured using a disc decorated with textiles or satin ribbon. Decorate the tie with artificial flowers or interesting brooches. The curtains are easily secured using wooden hair sticks. Choose contrasting shades if you want to add color, or solid colors for an understated interior.

Build a candlestick from glass hemispheres
Glass half spheres from a craft store look great in any room. If you love these little beautiful things, but don't know how to use them in your creativity, you will love this idea. Use the disk as a base for a candlestick, gluing hemispheres to it in the shape of a well. When you place a candle in such a candle holder, the flame will reflect off different surfaces, creating a stunning decorative effect.
This is how the era of recording information on disks passed almost unnoticed. The size of hard drives now allows you to hold all the necessary information, fast Internet eliminates the need to write something on blanks, and flash drives are so cheap that rewritable disks have also become history. Perhaps you have old CDs and DVDs lying around somewhere, and we offer you several options for using them in everyday life. For example, you could attach a disc to your bike or mailbox as a reflector, hang a few discs in the garden to scare away birds, or make a great desk lamp.
(Total 12 photos)
Post sponsor: New Year desktop wallpapers - Christmas trees, Snow Maidens, snowflakes, 3D graphics...

1. A post at a turn in a rural road can be marked with a disk.

2. Its reflective properties will also help a cyclist on a night road - a budget replacement for reflectors.

3. You can make an unusual lamp from a stack of old CDs.

4. A box for blanks will work as a case for an office or school snack.

6. Disk as a “scarecrow” - reflected rays of light will scare away birds and protect your plants.

7. The “throne” for the home “lord” can be installed on illuminated legs made from old blanks.

8. Another version of the disco ball.

9. The disc is perfect as a scraper for an icy windshield.

10. Such a figurine is the result of painstaking work.

11. But quite an impressive result...

12. And if there are a lot of disks and creative passion, you can make a three-dimensional installation.

13. We paste over the old blanks with colored paper with the names of the colors, cut out a segment of the disk using scissors, install it on a crossbar in a closet or dressing room - the separator for clothes by color is ready!

14. Another option for disco decor.

15. Plastic from old blanks can be used as a material for handmade jewelry.

16. The discs will serve as the basis for a decorative garland, with which you can decorate the nursery.

17. Print out paper dials in different styles and stick them on disks, which can be replaced on watches depending on your mood.

18. To achieve such artistic cracking of the shiny surface of a disk, just put it in the microwave for a quarter of a minute.
Progress in our era is advancing by leaps and bounds. So CDs were not used for long as the main storage medium. Now we use them for their intended purpose very rarely, or don’t use them at all. But CDs are very suitable as a basis for creating a variety of crafts.
On these pages you can easily verify this. Lots of step-by-step master classes on various crafts, including gift items, illustrated with photographs; ideas for creating a tabletop theater from disks are collected for you in this section.
Creative "discography" of MAAM - for creating original crafts.
Contained in sections:Showing publications 1-10 of 232.
All sections | Disks. Crafts from CDs
Introduce your child into the world of theater, and he will know how good a fairy tale is, will be imbued with warmth and kindness, and will take the fairy tale with him. (G. Popova) Theater is a game that occupies a special place in a child’s life. But what is a game without toys? The more toys, the more interesting the game. In our...
 In order not to pollute the environment, from CD- disks you can make it chic crafts. We make such owls every year with junior schoolchildren during school environmental week. We use big and small disks. To obtain wing blanks, disks preliminary...
Disks. Crafts from CDs - Goldfish. Master class from CDs
Publication “Goldfish. Master class from...”  To create this fish we will need: a sheet of A4 paper, a sheet of colored cardboard, two CDs, a heat gun, a pencil and scissors. On sheet A4 we draw a template of the tail, fins and mouth for our future fish. We cut everything out along the contour and transfer it to cardboard. Let's circle...
 Image library "MAAM-pictures"
 Children in the younger group require a special approach to themselves. Especially at this age, they ask to watch cartoons and this kind of entertainment. but we should not forget that at this age the child is fully developing and needs to be given daily attention and develop everything...
 Administration of the city of Ulan-Ude Education Committee MBDOU kindergarten No. 70 “Sun” Master class “Puppet theater from disks” At a modular practice-oriented seminar for teachers of municipal organizations of the city of Ulan-Ude “Artistic and aesthetic development of preschool children...
 Master class for teachers “New Year's souvenir” Master class on making a month from a CD. Author: teacher Fedotova O.M. MBOU "Maloshuiskaya secondary school branch of Maloshuisk kindergarten. Description: The master class is intended for educators and creative parents. Goal: creation...
Disks. Crafts from CDs - Master class on making crafts from CDs “Owl-Owl”
 New Year's toy made from CDs using decoupage technique. “New Year's Magic” Senior group “Droplet” New Year is the most long-awaited holiday. Many people love winter because of this holiday. All people are waiting for New Year's magic. Each family decorates their home with colored ribbons and...
If you decide to clean up your home, then you probably found a large number of CDs in your home. If you cannot find a worthy use for them, then do not rush to throw them away. It turns out that you can make wonderful crafts from them that will easily decorate your garden. And in this article you can find out what garden crafts you can make from computer disks with your own hands. Here we will offer the most interesting ideas that you will definitely like.
What crafts to make for the garden from old CDs
You can easily use old CDs to create useful and at the same time cute products.
Peacock for a summer cottage.
You probably already know that discs are suitable for creating absolutely any crafts. And if you have come across homemade crafts from disks before, today you can see several ideas for your own summer cottage. And if you love decorating your garden plot, then take a closer look at this peacock. You can use wood or plywood as a base. You must paint the finished bird figurine with paints.
But to create a luxurious ponytail, you will need a net and a few unnecessary CDs. You must cut out the base of the tail from the mesh, and only then glue several old disks to it using glue. Look how very beautiful it looks.

Three-dimensional figures from old disks.
Today you can see many ideas for using CDs. Craftswomen and craftsmen create a wide variety of garden crafts from computer disks. And if you have discs collecting dust at home, then find a worthy use for them. For example, in order to create such cute figures, you just need to break the disk into several pieces. You should do the same with all other disks. Then you have to make cute animals out of them.
Surely, they will look very nice in the design of your garden plot.


A craft that can be hung on garden trees.
Surely, on your garden plot there are trees that have a very unattractive appearance. You may not want to get rid of them. And you don't need to do this. After all, you can decorate such trees with figures from unnecessary computer disks. Use your imagination and create original animals that will definitely delight you.

Craft - a chair and from CDs.
Some people who have skills don’t just waste their time. It turns out that such craftsmen have learned from old disks to create practical furniture for their garden, on which it is convenient and pleasant to relax on summer days. But to make such a chair, you will need to collect a lot of disks. And this point must be taken into account.

Figurines.
You can also make interesting figurines to decorate your garden. Subsequently, you should attach them to sticks and place them in different parts of your garden. Surely, such a craft will delight all the guests of your home.
You can also make characters from the popular animated series - Smeshariki. And also place a similar craft in the country courtyard.


Useful craft from CDs.
Crafts made from computer disks for the garden may be useful. For example, if you create such a thing, then your garden harvest will not be touched by birds and other pests. The shine from the CD will repel birds and other pests that like to feast on the fruits of summer in the summer.

Finally
In this publication we have listed the most interesting crafts for you. And if you like to make unusual things, then this article was created especially for you. In general, get more CDs, be patient and start creating the most extraordinary things for your garden.
Over time, a lot of unnecessary things accumulate in the house, taking up extra space. But not all of them need to be thrown away during the next spring cleaning. For example, old CDs, DVDs and even cotton pads can find new life and turn into a stylish interior element. We have collected the best ideas for crafts from this material: simple ones for children and more complex ones for adults.
Craft options for the New Year
As the long-awaited holiday approaches, children and adults strive to decorate their home with cozy handmade crafts. Computer disks can be found in any home; many interesting, beautiful New Year's decorations can be made from them.
New Year's toys
- Old CDs.
- Alcohol.
- Cardboard.
- Gouache is white, blue or any other light color.
- Paper napkin with a New Year's pattern (Christmas tree, Santa Claus, snowflakes).
- PVA glue.
- Glue gun.
- Ribbon made of organza or satin 2-4 centimeters wide.
- A lace or thin ribbon 0.5 cm wide.
Alternatively, instead of napkins, you can print any New Year's pattern on plain paper, but I recommend napkins, they fit better on the work surface.
- First, degrease the surface of the CD with alcohol or cologne. After drying, apply several layers of gouache until it stops showing through. We glue a cardboard circle into the central part, which should be slightly larger than the hole in the disk.
- From a napkin we cut out a pattern, drawing, or a circle slightly smaller than a disk. Cover it with PVA glue and stick a napkin on it. To level the surface, apply a towel or soft cloth to the surface and smooth out the resulting wrinkles.
- After drying, we open everything with varnish.
- We repeat all the above steps with the surface on the reverse side.
- We make a bow from ribbon. We twist the lace into a loop and glue it with a glue gun along with a bow to the top of the craft.
Transformation of an old ball
This is a quick and easy way to update old Christmas balls. For the craft you will need:
- Old New Year's toys.
- Glue gun.
- Computer disks.
- Scissors.
We cut the disks using scissors into small fragments, triangular and diamond-shaped. Glue the cut objects to the surface of the New Year's toy with a glue gun. The craft is ready.
To cut discs, you need to use only large, strong scissors; small ones can break and become dull quickly.
Candlestick
This is a simple, quick way to make a candlestick.
You will need:
- CD.
- 5-6 fir cones.
- Glue or glitter nail polish.
- Aluminum candle stand.
- Candle, up to 3-4 centimeters in diameter.
- Rhinestones, decorative stones.
- Rubber glue.
Before making the craft, you need to immediately prepare the cones, cover their upper branches with silver or shiny varnish, or sparkles that will imitate snow. If desired, you can also glue small pieces of cotton wool, New Year's rain.
We glue an aluminum candle tray into the center of the product with rubber glue. We attach varnish-dried fir cones to it in a circle using glue. We decorate the free surface of the craft with rhinestones, sparkles, and decorative stones. The candlestick is ready, you can safely put a candle in it.
Underwater world from CDs
Children love to be creative; they can make many simple crafts from CDs and decorate their children's room with them. They can make souvenirs on their own or with the help of their parents.
Goldfish
You will need:
- Glue gun.
- CDs.
- Colored paper.
- Gold leaf
- Scissors.
We cut out eyes for future fish from colored paper: a slightly smaller black circle for the pupil, a larger white circle that will become the main part of the eye. We glue them together. Cut out lips of any shape from red paper. We will also work on the fins and tail; we will make them from gold foil of any shape.
Now you can begin the final stage. We begin to glue all the previously made parts. First, glue on the eyes and lips, fins on top and bottom, and glue the tail to the back.
The goldfish is ready, all that remains is to attach a lace or thread to it; if desired, you can cover its surface with nail polish with gold glitter.
sea turtle
You will need:
- Plastic bottle.
- A simple pencil.
- CD.
- Stained glass paints and outline.
- Glue gun.
- Rhinestones, flat stones.
In addition, for the job you will need comfortable small scissors.
- Cut a piece of plastic from the bottle. On it we draw with a pencil the outline of the head of the future turtle, its legs and tail. Carefully cut out the selection.
- Let's take a look at the disk - this is the future turtle shell. To begin, we outline the shell using a decorative outline in a circle. Then, we draw a contour of stained glass fragments along the entire circumference of the shell.
- After the outline has dried, fill the selected fragments with stained glass paint. Apply paint in several layers. Try to use different colors, it’s much more beautiful and colorful.
- Glue the shell, head, paws and tail of the turtle with a glue gun. We decorate the shell with rhinestones, small stones, and sparkles, securing them with glue. We glue two pebbles to the head as eyes. The turtle is ready.
Sea bottom
To make a craft you will need a minimum of time and materials:
- Paints.
- Seashells of different colors, sizes and shapes.
- Colored beads (preferably transparent).
- Old disk.
- Rubber glue.
- Transparent nail polish.
We paint the shells with paint, each in a different color. Leave them to dry and cover the surface with clear nail polish. Grind the remaining shells into fine crumbs. Glue the shells to the disk, sprinkle it with shell crumbs, imitating the surface of the seabed. Additionally, we decorate the product with transparent stones and beads.
Decorating with fragments
This material shimmers colorfully in the sun and has a bright shiny surface. This property can be used to decorate various items: boxes, photo frames, vases, flower pots.
Picture frame
To make crafts you need:
- Rubber glue.
- Old CDs.
- Thick cardboard.
- Scissors.
- Gouache.
- Ruler.
- A simple pencil.
Before starting work, you need to measure the size of the desired photo for which the frame will be made. You can simply trace the photo on cardboard, and create the outline of the future frame around it.
- From cardboard we cut out a frame for photographs of the desired size. We paint it with gouache (you can use different colors) on both sides. We apply paint in several layers so that the cardboard does not show through.
- We cut the disks with scissors into fragments of different shapes and sizes. We glue them to the frame, after first attaching them to the surface and figuring out how they will look. If desired, use a thin brush to go over the cracks and crevices between the fragments, painting them with white gouache.
- Leave the frame for 30 minutes until completely dry. Cut out a stand from cardboard and glue it to the back of the frame.
Flower pot sparkling in the sun
Turning an ordinary flower pot into a magical one is as easy as shelling pears. You will need old CDs, scissors, a glue gun and a little imagination.
First, we wash the pot; if there are any particles of earth left on it, wipe it dry. We cut the disks with scissors into small fragments of different shapes. Glue them to the pot with a glue gun. The craft is ready.
From box to box
It's hard to believe, but an ordinary cardboard shoe box can turn into a beautiful and useful thing.
To make the box you will need:
- Shoe box (it must be intact, it is advisable to use a new box).
- Glue gun.
- Old CDs.
- Big scissors.
- Furniture stapler.
- A piece of fabric large enough to cover a box.
- Decorative elements: stones, rhinestones, beads, seed beads.

We also recommend
 What can be made from computer disks
 Comparison of iPad and Samsung
 How to update your iPhone to the latest version Preparing your iPhone for an update takes a long time
 Download Minecraft for Android: all versions Download Minecraft old version for Android
 Let's go to Ender's world: how to find the portal?
 Install savefrom net extension for google chrome