How to burn MP4 files to DVD. How to burn video to disc? What program should I use to record video? How to burn to a disc to show DVD
Do you want all your favorite movies, videos or concerts in one place? Write it down on physical media - and then you will no longer have to look for anything in the bowels of your computer. All you need is Disc Studio. If you are eager to learn how to burn video to disc, just read the instructions below carefully.
Step 1. Download the utility
Before you get started, you need. The distribution weighs only 50 MB, which will allow you to quickly wait for the download to complete. Once the archive is downloaded, unzip it and install the application on your PC. Create a program icon on your desktop to always have easy access to it. Disk Studio supports all the most popular operating systems, including Windows 7, Windows 8, XP and Vista.
Step 2: Select a recording mode

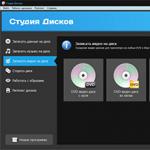
After you open the utility, you will have to select the desired mode from those presented in the main window. Let's say you want to know how to burn a video to DVD. To do this, select the “Burn video to disk” mode, not forgetting to specify what exactly you want to do. Thus, the program will help you prepare a DVD from scratch, as well as create a DVD or Blu-Ray from a folder. If the choice is made, proceed to the next step.
Step 3: Add videos

Next, select the videos that you want to transfer to the media. allows you to add videos of various formats, including MPEG, AVI, HD and others. Click the “Add Files” button and double-click to load the clips into the project. In a special column below, you can select a specific DVD type - 5 or 9. Since these types differ in the amount of recorded information, the disk capacity will be displayed on the bottom panel. As it fills with files, you will see how much free space is left.
Step 4. Design of the interactive menu

By clicking “Next”, you can start designing the disc menu. Among the available templates, select the one you like best, and then edit it. For example, to have the menu open with music, download the song of interest from the corresponding review. Specify the playback duration of the screensaver, customize the background and come up with text for the title. All menu elements can be freely moved around the layout, changing parameters such as shape, color, etc.
Step 5: Configure Other Settings

Before you burn video to disc, you need to configure the video type, video quality, and screen resolution. You can do all this in a separate window. You will then be asked to select the drive type and recording speed, and also specify whether you need to finalize the disc, verify the data, or turn off the PC after recording.
Step 6: Record Video

Once you have decided on the final settings, start burning a disc in the Disc Studio program. Click on the “Next” button and wait until all the files are written to your media. The recording duration will depend on the amount of downloaded data.
In the 21st century, DVD players still serve faithfully in many homes. At one time, films were distributed mainly only on discs, but today they most often reach our computers via the Internet. And now the question becomes how to burn a movie to a disc in order to watch it on DVD. We will consider all aspects of this procedure in this article.
So, we have the desired picture on our computer. The end goal is that it should be on media and playable on a DVD player.

Select a disk
The wide variety of DVD discs can be confusing. The following is a breakdown of the disk markings:
- DVD-R and DVD+R. Such media is suitable for write-once use only. It is no longer possible to delete or change the recorded information.
- DVD-RW and DVD+RW. But on discs with such markings you can record and re-record more than one movie.
Any of the listed disks is suitable for recording information. True, if we are talking about the “R” marking, then the media must be blank, but in the case of “RW”, you can overwrite the disk with unnecessary information.
In this article, we will tell you how to quickly and easily clear the Temp folder –
Windows DVD Studio
The developers of Windows 7 have foreseen that users may need to record media files for playback on a DVD. For these purposes they created a DVD studio. You can find it by clicking the “Start” button and selecting “All Programs”.

In the list that opens, you can easily find Windows DVD Studio.

In the window of this utility, add the required file using the appropriate button.

After adding a picture, you can set the name of the DVD (the default is the recording date). Click on the “Next” button.

In the next window, you can customize the text and appearance of the menu, and also preview how everything will look in the player. To start filling, click on the corresponding button.

A window will appear showing the DVD creation process. Converting the file format may take some time, especially if your movie is large.
This method is not available to users of Windows 8 and Windows 10, so you will have to resort to using special programs to convert and record information.
Video conversion
Next, we will show you how to record movies onto a disc for later playback on DVD. But the problem is that most movies today are distributed in avi format, which many DVD players do not support. Therefore, it is recommended to convert the file before uploading. However, if you are sure that your player will be able to play video with the avi extension, then you can skip this point.
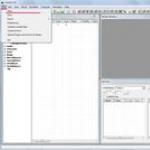
For conversion we will use the free DVD Flick program. On the right side of the program window, click “Add title” and add a movie.

Now just click the “Create DVD” button and wait for the conversion process to complete. DVD files can be found in the “My Documents” folder.

You can record a movie on a high-quality medium using Nero or UltraISO.
Nero
Nero includes a suite of utilities for working with CD and DVD discs. To record the picture we will need Nero Burning ROM.
Insert the disc and launch the program. A new project window should open automatically. In the upper left corner there is a drop-down menu where you need to select “DVD”. Since we will record a movie, select “DVD video” in the left field.

Be sure to make sure that the appropriate item is checked in the “Record” tab. It is also recommended to set the recording speed to 8. Now you can click on the “Next” button.

On the right side of the window, find and drag all the files received after conversion to the left. Now just click the “Record” button. At the end of the process, the drive with the media will open, on which the picture will be ready for viewing on DVD.

Ultra ISO
Many people prefer to use the UltraISO program for recording.
First, drag and drop the desired file into the program’s work area. We will use the same converted files. If you are sure that your player will play avi or another format, then you can simply drag and drop the movie.

Now select all the files and click the button in the top panel “Burn CD image”.

In the window that opens, select the drive and click the “Burn” button.

Our detailed article will teach you how to properly open APK files on your computer, .
Don't know how to choose the right RAM for your PC? Our material will help -
Conclusion
Whether a recorded movie will work on a DVD player largely depends on the player itself. Older models usually require conversion to a special format. You can use Nero or UltraISO directly for filling. Windows 7 users can use DVD Studio, but in the case of other OSes they will have to resort to special programs. Now you should have an idea of how to properly record movies and videos onto a disc for viewing on DVD. Good luck!
Quite often, many users are faced with the problem of how to burn a video to a disc so that later the film or video can be viewed on a regular DVD player or computer. There are quite a lot of recording methods. At the same time, it is not always necessary to use special programs, although it is better to give preference to them.
Video file types
Before you figure out how to burn video to disk, you should know what types of video files exist and what devices you can use to view them.
Perhaps the most common formats are the universal file types .avi, .wmv, .mpg, .vob, .mkv, .flv and others. However, here you need to clearly understand that video playback is directly related to the codec with which it is compressed. Depending on this, some problems may arise.
Playing videos on home players
As for household players, almost all of them play video files recorded on discs. But with this approach, one significant problem can be identified. The fact is that a standard file with the .avi extension is a kind of container in which the video is packaged. The use of different codecs (mpeg-2, DivX, Xvid) may cause the home player to not recognize the video or even the disc itself. This applies to a greater extent to older players; they are simply not designed for new signal encoding systems.

Even the use of modern technology does not guarantee the reproduction of a particular file format, since encoding technologies do not stand still, and new codecs are constantly being created that a home video system may not be designed for.
For outdated players, the question of which disk to record video on is also important. In this case, you should use DVD-R discs for recording, not DVD-RW (and certainly not Blu-ray discs). As for regular CDs of all modifications, their days for recording video are over. The fact is that their capacity is about 700 MB, and this is clearly not enough to obtain good quality. You can, of course, record video on a disc of this type, but you won’t have to talk about quality. Video compression occurs with a decrease in playback quality several times. By the way, you may not get surround sound, say, 5.1 format either.
The easiest way to burn video to disk in Windows
It’s worth noting right away that in Windows operating systems there are no “native” utilities for high-quality recording of video to discs. It is believed that one of the simplest methods is to directly send the desired file to a blank. This is done directly from Explorer or any other file manager.
In Explorer, select the desired file, and then right-click to open the context menu, which contains the Send To... command. A new drop-down menu selects the recording drive (eg DVD RW Drive) with the disc inserted. First, during the recording process, files are prepared for recording on disk media, after which the system displays a message indicating that it is ready to begin recording. A pop-up message appears above the System Tray in the lower right corner; click on it and you can start recording.

It should be borne in mind that recording video to disk in this case is performed simply as a normal movement of data from one place to another. There can be no question of any quality editing.
Converting videos to readable formats
Naturally, now the most common discs are DVDs. Using many special utilities, it is better to convert the initial video file into this format. This can be done using converters like Freemake Video Convertor. In the main program window, you need to select the “Video” section, add the necessary files, and then select the final format, for example, DVD, in the bottom panel.

Of course, you can use other popular formats, but no one can guarantee that an ordinary home player will play them. There should be no problems with software players in the form of programs installed on a computer. But sometimes you really want to watch your favorite film or concert on the big screen of a television panel!
Advantages of the DVD format
Using the DVD video format is the optimal solution today. It is worth paying attention to the fact that there are two main formats (DVD5 and DVD9), which differ in size. DVD5 is a regular DVD with a capacity of 4.37 GB, DVD9 is a dual-layer disc. This approach can ensure there is free space for video recording without losing quality.

After conversion or at the end of the recording process in special programs, the disc will contain two folders VIDEO_TS and AUDIO_TS. The first folder contains video and information files responsible for playback, subtitles, the main menu, etc. What’s most interesting is that absolutely all “hardware” players play such discs without problems. True, outdated players may not accept dual-layer DVD9 discs.
Programs for burning video to disk
If we talk about how to burn video to disk using special programs and utilities, it is worth saying that there are quite a lot of applications of this type. In this case, recording can be done with or without preliminary conversion, or using a pre-created ISO disk image.

Among the most popular software products that can help you burn video to disc are world-famous utilities such as Nero, Ashampoo Burning Studio, ConvertXtoDVD and many others. The first application does not cause problems in operation. For the second, it is better to use pre-prepared DVD video files. The third utility combines a converter and a burner, that is, having previously prepared the files, you can immediately burn the disc.

Recording process
As a rule, in all programs the processes of creating and recording videos are completely automated. You can burn a video to a DVD very simply if you follow the instructions of the “Wizard”. Usually the whole process comes down to selecting the files needed to record, and then clicking the “Start” button. In some cases, a window may first appear indicating the video and audio characteristics, as well as the codecs used, but if the disk space allows recording in the original quality or size, it is better not to touch the settings.
Using Quality Improvement Techniques
As for the quality of the final video, there are a number of points worth paying attention to. The best quality can be achieved by using the minimum recording speed. Usually it's 4x. If you can record at 2x speed, that's even better, but not all record drives support this speed. And there is no need to chase speed. For example, when recording at 16x or even 32x speeds, the quality will suffer greatly.
Some programs require two-pass encoding, as well as a “Do not remove audio gaps” function. They are useful if several films are written to one disk. You can also create a DVD5 video disc from a regular .avi file. In some cases, this helps improve the quality of the recorded material.
Sometimes you need to record a video of your screen. To do this, you should use specialized utilities such as Fraps, Bandicam, PlayClaw, CamStudio, FastStone Capture, UVScreen Camera, etc.
Conclusion
As you can see, the solution to the question of how to burn video to disk is quite simple. The presence of many programs allows even inexperienced users to perform all the necessary operations in 15-20 minutes. Of course, if you want to get good video quality, it’s better to first understand the additional settings that can be applied during the preparation process, and then during the recording process itself. Which program to record video will be up to everyone to decide for themselves. There is no single universal solution here. Each user himself chooses exactly what he will work with later.
However, novice users who are far from video converting systems or recording video to discs can be advised to use universal automated utilities that combine the functions of converters and recording applications. The presence of converters, as practice shows, can also be useful in further work.
If you take the process of using such software products seriously, you can confidently say that learning to use this or that utility is not difficult. As they say, there would be a desire.
Separately, it is worth saying that almost all applications in this direction are completely Russified, so knowledge of the English language is not required here. In addition, the interfaces are built at the simplest level, designed for intuitive understanding.
Each of us has our own ideas about free software. Some computer owners are hostile to it and prefer to deal only with commercially distributed products, the price of which includes not only the honor and respect of the developers, but also technical support services. Others are confident that enthusiasm alone will not get you far; they predict a sad future for free and open source solutions and, if possible, try to avoid them. Still others, on the contrary, believe in the bright prospects of free and open source software, actively use it in everyday work and just as zealously promote its use.
One can endlessly list the advantages and disadvantages of freely distributed products, but one cannot help but take away one important quality from them - the freedom of choice that they provide. If, when purchasing software from coin-loving developers, users usually focus on the thickness of their own wallet, then when choosing free and open source applications, they rely solely on their own needs and imagination. If you don’t like one program, you can, with a little effort, try a lot of other products whose characteristics approach, and in some cases outshine, other commercial solutions on the market. In order not to be unfounded, we decided to present a selection of applications for burning optical discs that can be a worthy alternative to paid programs and are a must-have element in the arsenal of every PC user.
⇡InfraRecorder
Developer: infrarecorder.org
Distribution size: 3.3 MB
OS: Windows 2000/XP/Vista/7
An open source CD and DVD burning program that supports ISO, BIN/CUE disk images. InfraRecorder works with rewritable and multisession optical media, can find a common language with Audio CDs and dual-layer DVDs, and is also equipped with functions for cloning discs and checking them for errors. One of the features of the application is the interface, implemented in the style of Windows Explorer and translated into forty-odd languages, including Russian. In addition to the standard editions of the utility for 32- and 64-bit platforms, the website of developer Christian Kindahl presents a portable version of InfraRecorder that works from any flash drive.
⇡BurnAware Free
Developer: burnaware.com
Distribution size: 5.9 MB
OS: Windows NT/2000/XP/Vista/7
A tool for burning CD, DVD and Blu-ray discs. The functionality included in the program allows you to burn Audio-CD, DVD-Video and MP3 discs, create bootable and multi-session media, and also create ISO images from them. BurnAware Free includes an automatic update module via the Internet and a mechanism for checking the recorded data to ensure that the process went smoothly. The utility's interface has been Russified, but the developers haven't gotten around to translating the help. In the process, the accelerator application tries to introduce the Ask.com toolbar into Windows, so those who are planning to twirl the tool in their hands are advised to be careful when installing it on their computer. It should also be noted that BurnAware Free cannot create exact copies of CDs and DVDs - this function is present in commercial editions of the product, which are beyond the scope of our review.

⇡ Nero 9 Lite
Developer: nero.com
Distribution size: 31.6 MB
OS: Windows XP/Vista/7
A stripped-down version of the well-known package for burning discs Nero Burning ROM. It will appeal to those who love Nero products and are willing to put up with the numerous limitations of the free version of the application. The program can only burn CDs and DVDs, copy them, as well as clean rewritable discs and display reference information about the discs used. The Nero 9 Lite application was created with potential buyers of the full edition of the popular package in mind, and therefore is replete with dialog boxes encouraging the user to make a choice in favor of a commercial product. Similar to the above-mentioned program, Nero 9 Lite also installs the Ask.com toolbar in the Internet Explorer browser and does this even if the checkbox is unchecked in the installer settings. And although the unnecessary component can subsequently be removed through the Windows Control Panel, the very fact of forced installation of the toolbar cannot but be alarming.

⇡ ImgBurn
Developer: imgburn.com
Distribution size: 4.4 MB
OS: all versions of Windows, Linux (using Wine environment)
One of the most powerful tools for working with CDs, DVDs, HD DVDs and Blu-ray discs. ImgBurn supports BIN, CUE, DI, DVD, GI, IMG, ISO, MDS, NRG and PDI formats, allows the user to create audio discs from MP3, MP4, MPC, OGG, PCM, WAV, WMA and other files, interacts with any optical drives and can check the quality of data recording. The program is characterized by a huge number of parameters through which the user can flexibly manipulate the characteristics of the utility and customize it in his own way. No less interesting is the fact that all operations performed by ImgBurn are logged and shown as a report in a special window displayed next to the main application window. It hardly makes sense to recommend this program to novice users, but advanced computer owners should like it.

⇡CDBurnerXP
Developer: cdburnerxp.se
Distribution size: 6.3 MB
OS: Windows 2000/XP/Vista/7
Features of this program are a built-in manager for printing covers for discs, a module for converting NRG and BIN images to ISO, as well as a rich toolkit for creating audio CDs from files in MP3, WAV, OGG, FLAC and WMA formats. Otherwise, CDBurnerXP is almost in no way inferior to ImgBurn, with the exception, perhaps, of the interface, which is easier to use and understandable to ordinary users. Thanks to the successful combination of all these factors, the utility has received special attention from many software portals and online media, including our online publication.

⇡DeepBurner Free
Developer: deepburner.com
Distribution size: 2.7 MB
OS: all versions of Windows
Another remake of a commercial product, the functionality of which was deliberately reduced by the developers. DeepBurner Free works with CD and DVD media (including multisession media), can create audio CDs and burn data borrowed from an ISO image onto discs. A Russified interface made in the style of Windows Explorer, an update checker module, settings for the drive buffer size - all this and much more is implemented in the program. For the convenience of potential users, the creators of DeepBurner Free have provided a portable version of the application, designed for copying to flash drives and subsequent launch on any computer at hand.

⇡ Ashampoo Burning Studio Free
Developer: ashampoo.com
Distribution size: 8.2 MB
OS: Windows XP/Vista/7
A product of the German company Ashampoo, distributed by the developer not directly from his own website, but through a network of partner sites. It differs from all the applications listed above in its ability to record data on CD, DVD, Blu-ray and create Audio-CD, Video-DVD, VCD, SVCD. The program supports work with more than 1,700 different drives, can copy media and create images in ISO, CUE/BIN, ASHDISC formats, and copes well with rewritable and multi-session discs. If desired, Ashampoo Burning Studio Free can be used as a tool for creating backup copies of data and then restoring information at the right time. The only thing missing in the German product is the function of creating bootable disks, which in some cases can be extremely useful.

⇡Burn4Free
Developer: burn4free.com
Distribution size: 2.2 MB
OS: all versions of Microsoft operating systems starting from Windows 98
A program for recording CDs, DVDs, AudioCDs, equipped with an interface that, when you look at it, involuntarily brings tears of sympathy to your eyes. If you brush them away and try to sort through the heap of keys, a good half of which, when pressed, redirect you to advertised sites, you can come to the conclusion that Burn4Free actually can do a lot, but getting to the functionality built into the product is not so easy because behind the ubiquitous pop-up banners. The application burns ISO images, supports working with various music formats, interacts with more than three thousand models of optical drives and is distinguished by other talents hidden under a layer of buttons of an archaic and completely stupid interface.

⇡ Small CD-Writer
Developer: small-cd-writer.com
Distribution size: 411 kb
OS: Windows (no information about specific versions)
The only program in our review for burning CDs and DVDs, created by the hands of domestic wizards. Unlike most similar programs, Small CD-Writer has a miniature size, works without installation, and does not require space for caching files. The utility allows you to create multi-session and bootable disks, burn ISO images of CDs, view all sessions on the disk and extract files from them, save projects on your computer disk. Automatic detection of the burner drive and recording speed, coupled with the most simplified interface, allows users of any level of training to work with the program. To transfer files to optical media, simply select the “Send to Small CD-Writer” menu item in Windows Explorer and click the “Burn” button in the window that opens.

⇡ Express Burn
Developer: nch.com.au/burn/
Distribution size: 470 kb
OS: all editions of Windows, Mac OS X (starting from version 10.2)
Another miniature CD, DVD and Blu-ray burner. Despite its modest size, Express Burn has such functions as recording user data, creating audio and video discs, copying optical media and working with ISO images. A distinctive feature of the program, according to the developers, is its high speed and low requirements for computer computing resources. We were unable to find any shortcomings with Express Burn. The only disappointment was the lack of a portable edition of the product designed to run from flash devices.

⇡ Conclusion
Insert a blank DVD into your computer's optical drive. You can use any disc format as long as your DVD drive supports it. The disc formats are DVD±R and DVD±RW, although DVD±RW discs will likely not work in regular DVD players.
- If the AutoPlay window opens, close it.
- If your computer doesn't have a DVD drive (it's marked with the letters "DVD" on the tray or somewhere nearby), buy and connect an external optical drive.
Download DVD Flick. With this free program, MP4 files can be burned to disc so that it will play in most DVD players. To download this program:
- Go to http://www.dvdflick.net/download.php in your browser.
- Click "Download DVD Flick" in the middle of the page.
- Wait for the download to begin. You may have to select a download folder and/or confirm the download.
Install DVD Flick. Double-click the downloaded installation file, and then follow these steps:
- Click Next.
- Check the “I Accept” box.
- Click Next four times.
- Click "Install".
- Click Next.
- Click Finish.
Launch DVD Flick. Double-click the film clip icon. The DVD Flick window will open.
- First, click OK or Close on the additional information window.
Drag and drop the MP4 file into the DVD Flick window. Find the MP4 file you want and drag it into the DVD Flick window.
- If the program opened in full screen mode, click the two squares icon in the upper right corner of the window, and then click and drag the top of the window to reposition the window on the screen.
- If you have two windows open, drag one to the left side of the screen and the other to the right side of the screen.
Click on Project settings (Project Settings). This tab is at the top of the DVD Flick window. The DVD Flick settings page will open.
Click on the tab Burning (Recording). It's on the left side of the page.
Check the "Burn project to disc" box. You'll find this option at the top of the page. Now you can burn the MP4 file to DVD.
Click on Accept (Accept). This option is at the bottom of the window. The settings will be saved and you will be returned to the DVD Flick home page.
- If you only want to burn video files to discs using DVD Flick, click "Use as defaults."
Click Create DVD (Create DVD). This button is at the top of the window. DVD Flick will begin burning the video file to the DVD.
- If a message appears asking you to enter a different file name, click Continue.