How to set up a satellite dish yourself inside and out. Installation and self-tuning of the tricolor TV antenna for satellite Assembling the antenna connecting the cable to the converter and switch
Today in Russia, satellite television is finding more and more fans, especially since in many localities it is simply unrealistic to have a high-quality picture on the TV screen using a regular antenna. However, not everyone can afford to pay a subscription fee, which for some operators is quite an impressive amount, so the question is: what you need to watch free satellite TV is very, very relevant.
So, the most common version of a TV system that allows free viewing of satellite channels, is the so-called system for three satellites (HotBird 13°, Amos 4°, Astra (Sirius 5°)) since to watch channels from these satellites you do not need to purchase special cards or spend money on a subscription fee. However, the choice of channels for viewing will be relatively small, in particular, you will be able to watch about 10-15 Russian channels of international format, some open Ukrainian channels and several hundred foreign channels, including encoded ones, with Russian-language sound, including channels for adults. . Moreover, today some encrypted channels can be watched, as they say, “for free”, if you use receivers or CAM modules with a built-in emulator, and lovers of “strawberries” can purchase channels with erotic content to watch .
Second option to implement free viewing of satellite channels- channels broadcast from three eastern satellites: Express AM22 53°, LMI-1 75° and Express AM2 80°, from which Russian channels can be received. However, these satellites do not have music and foreign channels.
And it is best to combine the two previous options, i.e. install any of the eastern satellites, in addition to the three-satellite system. You can also use a rotary system option consisting of both western and eastern satellites.
Tuning for 3 satellites HotBird 13° - Amos 4° - Astra (Sirius 5°)
In order to connect to the 3 satellite system, in addition to the TV and receiver, you will need:
· ;
· 2 , which are additional plastic fasteners;
· 3 ;
· support or mast for fixing the antenna;
· 4-port DiSEq C - head switch;
· F - connectors;
· RF cable (75 Ohm).
Preparation
· Screw the arc to the antenna mirror.
· Install the fastenings to the bracket and multifeeds of the convectors, starting with the convector for Hot Bird 13E (closer to the antenna mirror), then for the head Amos 4W and, finally, we attach the convector to the central axis Astra 5E.
· Cut 3 pieces of 1 m length from the HF cable, put on their ends F - connectors and provide insulation of the metal part.
· Screw the cable sections to the 4-port DiSEqC.
Antenna installation
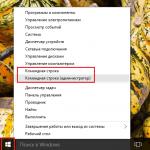
It is best to install the antenna on the wall or roof of a building, on a mast or tower, since in the south-west direction there should be no houses, trees or other obstructing structures that could interfere with the free passage of the signal emanating from the satellite to the receiving dish.
If you are installing the plate on the wall of the house, and this is probably the most preferable option, you will first have to secure the bracket using anchor bolts or dowels of the appropriate size. Then you need to place a pre-prepared satellite dish on the bracket, but without a disc.
Instructions for setting up a satellite dish
To set up a satellite dish for 3 satellites:
· First, set up the satellite dish to Astra (Sirius).
· The antenna tilt and rotation angle bolts are compressed, since they will not participate in tuning the antenna to the other two satellites Amos and Hotbird.
· Connect the central convector Astra (Sirius ) using a cable with the receiver and tune the antenna to the corresponding satellite. Moreover, for setup it is best to purchase in advance .
· Select the “Antenna installation” mode in the receiver menu.
· In “Manual search” the frequency is set to 11.766 GHz (corresponds to the satellite Astra 4.8E ), horizontal polarization - H, flow rate - 27500 and automatic error correction.
· The antenna is oriented towards the probable location of the satellite, which is determined either by a compass or by the antennas of neighbors, which is much simpler.
· Having chosen the right direction and set the tilt angle to the middle position smoothly and slowly, checking whether the signal appears on the “Quality” scale, rotate the antenna in the horizontal direction, first in one direction, and if the scale does not respond, then in the other.
· If the signal does not appear, then slightly change the angle of inclination in the downward direction and again move it in the horizontal plane, repeating these actions until a signal appears.
· As soon as the signal is caught, they stop and with light movements to the right - left and down - up they achieve its maximum level.
· Rigidly fix the bolts for fastening the angle of rotation and the angle of inclination of the plate.
· To fine-tune the convector, rotate it slightly in the holder and, moving it slightly along the holder in the back and forth direction, achieve the maximum reading on the “Quality” scale.
· Trying to “catch” channels from a satellite Astra , if everything is normal, then the antenna is tuned specifically to this satellite.
· Tighten the adjusting screws.
· Setting up 2 other satellites ( Hotbird and Amos ) why find the positions of the corresponding converters relative to the central one.
· To set up Hot Bird connect the cable to the convector for Hot Bird , and on the receiver set the frequency to 10.815 GHz, vertical polarization - V , flow rate - 27500 and automatic error correction.
· Also connect Amos and configure the receiver - frequency 10.722 GHz, horizontal polarization - H , flow rate - 27500, error correction - auto.
· Check the fastening of all plate elements.
· Connect DiSEqC using cable sections with corresponding convectors.
All! Now you can watch free satellite TV.
Satellite television is rapidly conquering the television services market, and yesterday's luxury - a satellite dish - has become commonplace in millions of families. There is an opinion that installing a “dish” is the job of professionals, and that the average person simply cannot understand how to set up an antenna.
Below we will try to dispel this myth by showing in practice what and how to do to join the era of satellite television on your own.
Selecting a satellite
Once you have the idea of purchasing a satellite dish yourself, you need to decide on a satellite television operator, in other words, on the satellite from which the antenna will receive the signal.
Satellite television is named so because it uses a system of orbital satellites located in space. They receive signals from television stations and then broadcast them to vast areas below them. Satellite antennas receive the signal and reflect it to the collecting head (converter), which transmits it further to the receiver (tuner), from where it goes through the final decoding stage and ends up on the TV in the form of images and sound.
It becomes clear that one satellite dish is not enough to receive a signal. To do this, an entire system of satellite equipment must be installed and properly configured. We will begin to consider it a little later, but for now let’s return to choosing a satellite.
Today there are two types of satellites. The first ones broadcast open channels, the others - encrypted ones. It happens that the equipment on the satellite is used by different operators. In this case, you will have to purchase a card for decoding each channel separately.
But most often the channels are collected in packages, and it is enough to purchase one single card yourself to gain access to all of them at once.
Russian-language channels are broadcast from various satellites located over different latitudes and meridians. To receive a signal from a specific source, you need to very accurately install (direct) the antenna towards it and adjust the reception frequency. If your preferred satellites are located close to each other, then you have every chance of receiving signals from them using just one satellite dish.
The YAMAL 201 satellite allows you to watch up to 30 Russian-language channels in the public domain. There are also many other devices operating in low-Earth orbit that broadcast free channels. When choosing a satellite television operator, pay attention to Tricolor-TV. Over the course of several years of operation, this operator has built up a solid customer base, which is direct evidence of the high quality of the services it provides. In addition to it, we can recommend NTV-Plus (with an extensive list of channels) and Raduga-TV.
You can independently find a list of satellites with free broadcasting on the website Frocus.net, with paid ones - on the official websites of the above operators.


When choosing a satellite, check whether you will be able to point your satellite dish at it. If there are objects in the signal path that create interference (another house, power lines, trees, etc.), consider installing a “dish” on the roof. Well, if this turns out to be impossible, you will have to turn your attention to the satellite located in the expected visibility zone of the antenna.
Purchase of equipment
Before installing and configuring satellite equipment, it must be purchased. You need to go to a specialized store for the following elements for assembly:
- "Plate" (antenna). It will “collect” the signal from the satellite, concentrate and reflect it into the converter. Recommended diameter is more than 90 cm.
- Converter (head). It will pick up the signal that hits the antenna and, after conversion, transmit it to the receiver. The choice depends on the polarization (circular or linear) of the preferred satellite, in the description of which this parameter can be found.
- Receiver (TV tuner). It will receive a signal from the converter, then decode it (“translate” it into the language of the TV) and transmit it to the final destination - the TV. Setting up this device does not require special knowledge.
- Bracket (“leg”). Provides reliable mounting of the antenna on the wall (or roof) of the house. In addition, it will allow you to quickly rotate the plate in two planes (to search for a signal). Make sure that the plate is far enough away from the house so that when it rotates it does not touch the wall. In general, installing an antenna without a bracket is impossible.
- Cable (coaxial). Acts as a signal conductor, connecting the converter to the receiver (tuner).
- DiSEq. Masters simply call it “disek”. It will be necessary if you decide to receive signals from several satellites at once. In this case, it will help to combine a group of converters into a common cable.
- "F-ki." Without them, it is impossible to connect the cable to each link in the antenna-receiver chain. You will need 8 pcs. (for reinsurance - 10).
- Cable for connecting the receiver to the TV. It can be: composite (tulip), SCART, or HDMI (for the highest quality). You need to check for yourself which cable is suitable in your case.


All of the above devices and devices can be purchased as part of a satellite television kit, which has already been assembled by professionals. You can assemble it yourself - in this case you will be confident in the quality and reliability of each element of the system.
Self-installation of the antenna
Before moving on to this step, you should be absolutely sure of where your satellite dish should be pointed. The Agsat.com.ua/satdirect service will help you make the right decision. You just need to indicate the location where you plan to install the antenna and select the required satellite. After this, instructions for choosing a direction will appear on the screen.
Before proceeding with the installation of the system, it is recommended to make sure that there is a signal (it should reach 60-70%) by holding the antenna in your hands. If the test is successful, the next step will be to install the bracket.
Make sure the mounting location is secure and, using a hammer drill, make holes in the wall for anchors, the size of which should be selected depending on the wall material and the weight of the entire structure being mounted. Having secured the bracket, proceed to installing the satellite dish itself (a description of this process can be found in the instructions for it). Remember: until you are sure that it is in the correct direction, there is no point in tightening the nuts. First you need to set up your satellite dish.
Connection and setup
Setting up satellite dishes yourself does not begin until they are connected to the receiver. To do this, you need to prepare a cable (screw the F-piece onto it) and transfer it from the converter (head) to the tuner.
We prepare the coaxial cable according to the following algorithm:
- Cut off the insulating layer (1.5 cm from the edge) of the cable;
- We bend the shiny braid (made of small aluminum strands) outward;
- We free the cable core from the foil screen (you need to get rid of about 8-9 mm of the screen);
- We clean the core (the main copper core) from the remaining enamel and put on the F-piece.
- It remains to make sure that the core “looks out” from the F-ki by no more than 2 mm. All excess must be cut off with pliers.
- We do the same with the other end of the cable (having independently measured the required length in advance).
- We connect the cable to the converter (if there are several of them, then we combine it into one using a disk), and pull the other end to the receiver.


The system installation is complete, the next step is configuration.


The antenna is positioned correctly and “looks” at the satellite (approximately for now). Go to the receiver settings and select, for example, the Sirius satellite. For it you need to specify the frequency “11766”, speed “2750” and polarization “H”. Two bars will appear on the screen: the first shows that the dish has received a signal, the second shows its strength. If the satellite dish is installed correctly, you should see at least 40% signal strength. All that remains is to improve the quality, which is still around zero. We leave the TV and go to the plate. It is advisable that you can see changes on the signal scale. But if you cannot monitor them yourself, leave an assistant who can correct your actions - it will be easier to set up the system with him.
Start by turning the satellite dish all the way up to the right. From this position, slowly, constantly monitoring the signal level from the satellite, rotate the dish to the left.
If you cannot catch a signal, you need to lower the antenna a couple of millimeters (the fasteners are usually marked), and then repeat the rotation of the dish.
Setting up a satellite dish yourself simply involves a painstaking search for a signal through manual adjustment.


First you need to achieve at least 20% quality, after which you can fix the satellite dish more firmly. After this, with light manipulations (literally by degree), we rotate the plate left and right in search of 40%. But this is not enough. For good work you need at least 60-80%. Further “adjustment” is made by manipulating the converter, which must be turned clockwise or counterclockwise. When the signal level is satisfactory, you can proceed to debugging the side converters (if you do not have them, skip this step).
Setting up additional heads will be much easier, since the main antenna already catches the signal in full. All that remains is to indicate for each converter its own satellite (select in the receiver settings, and also indicate the frequency, speed and polarization) and by rotating or bending the head leg to catch an acceptable signal.
Pay close attention to the markings of the inputs in the disc (A, B, C...). They will need to be specified in the same sequence in the tuner.
The last step is setting up the TV
All that remains is to scan the satellite for channels and set up the TV (arrange the channels in the desired sequence for ease of search). If you are dealing with a paid access, insert an unlock card purchased in advance from the satellite television operator.
If you decide to install a set of satellite equipment, then we will tell you how to install a satellite dish and how to set up a satellite receiver. This article will consist of the following blocks:
More and more users are abandoning cable television and preferring satellite television. This is quite logical, since cable TV subscribers are not always satisfied with the list of cable channels. In addition, now wide-format Full HD TVs are in wide demand and, according to the plan, on such TVs, you need to watch high-definition HD television, and not analog cable, the picture quality of which, to put it mildly, does not correspond. Yes, the issue can be solved by connecting digital cable television, but again, the list of channels will be significantly reduced compared to what can be watched through a satellite dish, and in addition, the cost of a cable receiver is almost equal to the cost of a satellite one. If we talk about the private sector and suburban areas, then satellite television is the only option for viewing a wide range of channels.
Selecting a satellite
First of all, before installing a satellite dish, you must choose a satellite television operator, or rather, a satellite to which the antenna will be directed. For beginners, we will cover this issue in more detail.
So, the essence of satellite television is that the signal from certain TV channels is sent to a satellite located in space, and it is from this satellite that each subscriber receives the signal to their satellite dish. The signal received by the antenna is sent to the tuner (receiver), where the signal is processed, and for some channels decoded, and then sent in “ready” form directly to the TV. We will look at the very structure of the set of satellite equipment for receiving a satellite signal a little later, but now we are interested in the choice of satellite.
Today, both open and encrypted channels are broadcast from satellites. Channels can either be placed separately on the satellite or be part of a package of channels that belongs to the satellite operator. Most satellite channels are encoded so that subscribers pay money to watch them. For the convenience of viewing a large number of channels from one satellite, and for a single payment for viewing them, there are satellite operators. Russian-language channels are broadcast from different satellites, which are located in different positions. To receive a signal from a satellite, your antenna must be clearly aimed at the selected satellite. If the satellites you choose are close to each other, then most likely you will be able to receive a signal from both satellites on one antenna.
Thus, if you want to watch up to 30 free Russian-language channels, then for this we advise you to point your satellite dish at the YAMAL 201 satellite. Also, there are other satellites with channels open for viewing, but they are not as full as Yamal. As for satellite television operators, this is: the most popular operator Tricolor-TV, the number of subscribers of which is growing at an intensive pace, it is also necessary to mention such a satellite operator which includes the largest list of channels - this is NTV-Plus and, of course, the operator Raduga -TV. You can get acquainted with the list of channels and the cost of packages of these operators on their official websites.
So, initially you choose the type of satellite broadcasting: free or paid. To select a satellite with free channels, use the Frocus.net service; to select paid packages, use the official websites of satellite TV operators. If you have a widescreen TV, keep in mind that some operators already broadcast in HD format.
Another nuance when choosing a satellite is the ability to point a satellite dish at it. If the windows of your apartment face a different direction from the satellite, or there is interference in front of the house in the form of trees or houses, then the antenna must be installed on the roof. If for some reason it is not possible to install an antenna on the roof, then you will have to choose another available satellite.

What is needed for satellite television
Once you have determined which satellite you will receive the signal from, and whether it will be open channels or it will be directly from the satellite TV operator, you can purchase equipment for receiving the satellite signal.
The satellite equipment set includes
- Receiver (tuner) is a device that receives, decodes and converts a signal for viewing on a TV.
- Antenna (dish) - designed to receive a signal from a satellite; it is from the antenna itself that the satellite signal is reflected and sent to the convector.
- Convector (head) - necessary for receiving the signal reflected from the antenna from the satellite, where the signal is converted and transmitted to the receiver.
- A bracket is a metal structure that is attached to the wall, and then onto which the antenna itself is attached.
- Cable is a television coaxial cable that connects the convector to the receiver.
- DiSEq - if you will receive signals from several satellites on one receiver, then a disc is used to connect the convectors into one cable.
- F-ki – connectors that are used to connect the cable to other satellite equipment.
- The connecting cable between the receiver and the TV is tulips, SCART or HDMI cable.

Receiver
We talked in detail about how to choose a satellite receiver in a separate article, so if you have not purchased one yet, we recommend reading this article.
Antenna
As for satellite dishes, the only thing you need to focus on when purchasing is its diameter. In order to receive a signal from most satellites, an antenna with a diameter of 90 cm is sufficient. If the antenna is planned to receive a signal from several satellites, then the diameter of the antenna depends on the degree distance of the satellites from each other.
Convector
The polarization of the convector depends on the satellite: circular or linear. For example, to receive a signal from the Eutelsat 36 satellite (Tricolor-TV and NTV-Plus for residents of the European part of Russia), you need a convector with circular polarization.
If you plan to watch satellite television on two televisions (TV and computer), then purchase a convector with two outputs to connect two receivers.
bracket
The bracket should be attached to three or four anchors. The length of the leg should be such that you can freely turn the antenna in the desired direction and it will not rest against the wall.
Multifeed
To mount several convectors on an antenna, use a multifeed.
DIY satellite dish installation
First of all, you need to assemble the satellite dish itself; this video will tell you how to do this in detail and clearly.
Before installing a satellite dish, you must know specifically where the antenna should be directed; for this, the Agsat.com.ua/satdirect service will help you. On the map, select the place where you plan to install the antenna by checking the box there, select the intended satellite in the side column and they will show you where to point the satellite dish. Before installing the antenna, we recommend checking the signal reception not by strengthening it, but by holding it in your hands. If the quality of the signal from the satellite reaches 70%, then we proceed to installing the antenna.

When the location is determined and checked, using a hammer drill we make holes for attaching the bracket to the wall with anchors. Choose the size of the anchors based on the wall material and the weight of the structure. After you have strengthened the bracket, we mount the antenna, but do not rush to tighten the nuts, since first we need to direct the antenna.
How to set up a satellite dish yourself
While the antenna is already on the bracket, we connect the television cable to it.
How to connect a satellite dish
To connect a satellite dish, you need to screw an F-piece onto the end of the cable. To do this, cut off the insulating layer of the television cable 1.5 cm from the edge, bend the screen braid in the opposite direction, cut off the foil screen (0.9-0.8 cm from the edge) that insulates the core of the cable and screw it onto the prepared end of the cable F- ku. If the cable core protrudes beyond the F level by more than 0.2 cm, then it is recommended to cut off the excess. We do the same with the second end of the cable. Then, connect the first end of the cable to the convector, and connect the second end to the receiver, at the very end of the installation, as indicated in the instructions. If you have several convectors, then first we connect the cables coming from the convectors to the disk drive, and directly from the disk drive one cable will go to the receiver.

So, when the antenna is fixed on the bracket and the cable is connected, we tune the antenna to the satellite. We direct the antenna according to the compass, and adjust it based on the signal level menu in the receiver. Another point when setting up the antenna is the required angle of inclination relative to the horizon; each satellite has its own angle.
When you have achieved a high-quality level of signal reception, firmly fix the nuts on the antenna and fasteners so that they do not unscrew due to wind and vibrations. Then we fix the cable so that it does not dangle anywhere. It is recommended to make a so-called cable loop immediately from the convector so that moisture flows down and does not flow along the cable.

How to set up a satellite dish tuner
You will find a detailed description of the tuner settings in the instructions for it. First, select the receiver's menu language and check its firmware version, comparing it with the latest official version. If the latest firmware has significant changes and positive user reviews, it is better to reflash the receiver.
After this, you need to set the time, time zone, etc. in the channel search menu, select a satellite and enter the necessary settings for it (if you are using a disc, then set the number of the input to which the convector directed to this satellite is connected).
Then display information about the signal level - it is from this information window that you configure the antenna. When the antenna is configured and the signal level is high, we scan the satellite. To open access to channels, insert an operator access card.
class="eliadunit">
After we have decided on the antenna installation location and its approximate direction, the pre-assembled antenna is hung on the bracket. Afterwards, additional multifeeds and converters, cables and other structural elements are installed.
- IMPORTANT: To fine-tune the antenna, it must be moved vertically/horizontally. BUT you should tighten the fastenings just enough so that the antenna itself does not move or change its tilt, but you can still move the antenna in planes, albeit with force. To do this, the left/right screws are not fully tightened.
For example, the free lower left screw on the U-shaped adjustable element of the antenna (see photo) allows you to adjust the antenna according to vertical, and those on the clamp for fixing the antenna to the wall mount, usually there are two of them, - according to horizontal.
What is multifeed and how does it work?
Multifeed- this is a design that allows you to receive several satellites SIMULTANEOUSLY on one satellite dish due to the possibility of installing additional heads (converters). This allows you to save money on purchasing an additional satellite dish.
Multifeed law: angle of incidence = angle of reflection
An antenna is often called a mirror. And in the case of multifeed, the laws of optics and reflection apply (remember physics?) Specifically: The angle of incidence is equal to the angle of reflection. That is, if you adjust the antenna to the corresponding satellite so that it is in focus, then the signal from a neighboring satellite located at a different orbital position will be reflected not at the converter that is in focus, but at some other point. This whole thing works according to the same law!
This law is easy to understand:
If a neighboring satellite (Amos 4) in geostationary orbit is located to the right of the focus of the central converter (Sirius 4.8) of the satellite antenna, then the reflection of its signal (yellow arrow in the figure) from the dish mirror will be focused to the left of the place where the central converter is located in the focus of the antenna. (see pic)

If the satellite is higher, the signal will be focused lower. In general, the effect of a mirror.
Tuning an antenna to a satellite with installed multifeeds
Then you need to put 2 mutifeeds on the antenna nose mount, which already has an installed holder for the main converter (the converters are fixed in all holders). Next, everything needs to be tightened securely, but it is possible to rotate the converters in multifeeds in all directions and planes with some effort. The cable system is connected at the very end.


Setup: Steps in a painstaking process
Setting up equipment is quite a troublesome task and requires a lot of time. It all starts with screwing it to the center. F-connector converter with a piece of cable 2 meters long. The other end of this cable is fixed to the receiver.
The receiver itself connects to the television receiver. Be careful: the power (220 V) must be turned on only after connection. Another important point to remember: when you screw on the F-connector, make sure that the shielding film and the thinnest conductors on the cable braid do not short-circuit with the central core. Otherwise, everything may end in a breakdown of the receiver!
Setting up a satellite dish for the main Sirius 4.8E satellite
Turn on the TV and receiver. Go to MENU - INSTALLATION, then to SEARCH CHANNELS. On the left you will see a list of satellites from which reception will occur. Select the desired one, for example, Sirius 2/Ku 4.8E, if the central converter is configured for it, which was previously firmly fixed.
- LNBP- turning on the converter.
- LNBP Type- choose Universal (the type can be found in the documents for the converter).
- LNBP Freq- 10600/9750 (this data is also indicated in the instructions for the converters).
- 22Khz- select the AUTO item (this is the signal that switches the disk).
- DISEqC- leave NONE (if you connected the signal reception directly, without using DISEqC).
Then look for the corresponding button on the remote control: it will take you to the transponder submenu. This is where you will need to look for a satellite signal. TIP: mark in advance a couple of transponders from satellites with different polarizations and any channels (preferably free) that actually WORK (FTA). These are easy to find on the Internet on specialized sites.
- EXAMPLE: let's look at the option with transponder 11766H. It broadcasts at a frequency of 11,766 Mega Hertz (horizontal polarization). To make it more convenient to adjust the quality of the picture and signal, it is better to display all information in full screen mode. There is an INFO button for this. It will be convenient to navigate the quality using the microscale located below.
Don’t be alarmed if at first the “quality” of the signal is 0. The reason for this failure is quite understandable: at the very beginning we discussed options for directing the antenna and turned it in the right direction using the “scientific poke” method. And now the time has come to tune the antenna in all planes. Get ready immediately for a long and monotonous process that requires accuracy, attentiveness and self-control. Why? A couple of millimeters and the signal will be lost. It won’t even be a matter of its poor quality, but its complete absence!
Tuning the receiver antenna in planes
First you need to find one ideal vertical position. Then slowly and smoothly try to rotate the antenna horizontally. In this case, you need to constantly monitor the signal quality scale. As soon as the number moves from 0, it means you are acting correctly. In this way, you should bring the scale to at least 15. It is possible that all manipulations with horizontal movements will be unsuccessful. Then you will have to return to the vertical position and change it a little. And then start all over again: careful movements left and right until a signal appears, at least a small one. Your task is to achieve the highest quality of reception. Doing this, of course, is not easy, but without this, as they say, there is nowhere.
You can try to slightly rotate the converter in the holder (around the axis). There are even special marks on the case for this. You can also move it a little back and forth along the holder, while achieving maximum readings on the QUALITY scale.

The conclusion is this: to achieve better signal quality, you need to try ALL adjustment options. This is the only way the result will satisfy you completely.
- IMPORTANT: if you have double-checked everything a hundred times, tried to adjust the antenna, changed the receiver settings several times, but still haven’t found a signal, try replacing the converter. There is a possibility that it is simply broken.
Have you achieved the best possible reception quality? Congratulations! It seems like it's time to tighten the screws and enjoy a job well done?! Not everything is so rosy. Remember: the setup was carried out with a transponder broadcasting ONLY in horizontal polarization (mark “H” on the body). It is also necessary to configure the V-transponder, that is, with vertical polarization. Yes, and back into battle!
In each specific case, completely different actions can help. Somewhere, a slight rotation of the converter around its axis clockwise or counterclockwise leads to success. And some have to scan transponders in a manual search. A description of this process can be found in the documents for the purchased receiver. And then visually monitor the reception of certain channels and their correspondence to the desired satellite.

Let's tighten the nuts!
The long-awaited moment has arrived when signals in both polarizations produce the highest possible quality. Now you need to tighten the nuts very tightly and firmly. And here again difficulties can overtake you: by tightening the adjusting nut, you, without meaning to, slightly change the direction of the antenna. As a result, the signal quality again noticeably decreases! Therefore, this must be done extremely carefully, with great caution.
Position of converters on multifeeds
Before you start setting up converters on multifeeds, you need to know their angle of inclination to the horizon and understand how they will be located.
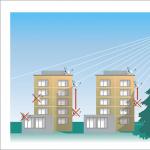
Satellites in the sky in geostationary orbit relative to the territory of Russia are located along an arc that runs closer to the south of the sky. To an observer it will look something like this:

Therefore, the location of the converters on the antenna should be inverted and mirrored. If the antenna is directed to the southern sector, then the neighboring converters will be located conditionally like this: 
If the “dish” is tuned to a Western satellite, then the converters on the multifeed should be positioned like this:

And finally, if the satellite antenna is directed towards one of the eastern satellites, then the “heads” in the neighborhood should be positioned as follows:

Let's look at another important point that you should always remember. Since a satellite transmits a signal in most cases in horizontal or vertical polarization, for different satellites vertical polarization will not always be “vertical”, and, accordingly, horizontal polarization will not always be “horizontal”. Vertical and horizontal polarization will remain exclusively for the southern satellites, and for all others the polarization will be somewhat “tilted”, as shown in the figures. Therefore, both the central converter and the converter on the multifeed must be positioned at a certain angle relative to their axis. For this purpose, there are special division marks on the converters.
Calculation of the position of converters on multifeeds relative to the central head
The Rainbow TV: Installer Assistant program, which can be downloaded here, is intended for calculating the installation angles of a satellite dish. It also contains all the information for setting up the multifeed. To calculate the multifeed, you can use the corresponding tab in the program. Converters will need to be placed according to the design diagram presented on the tab as a result of the calculation.
Here is an example of a calculation using the program for our multifeeds with distances relative to the central converter:

Where Hor- distance from the core of the central converter to the center of the head on the multifeed a Ver- distance from the center of the main converter to the center of the head on the multifeed.

Setting up multifeed to satellite
So, the antenna itself and one of the converters are successfully configured. After this, you should turn off the receiver and twist the cable of the central converter to the converter from the multifeed. Then turn everything ON again.
A familiar menu will appear in front of you, only now you should select Hotbird 13E and another valid transponder. As in the case described above, it is necessary to systematically achieve excellent signal reception. However, here it is not the antenna itself that will have to be moved, but the converter on the multifeed. By the way, it is capable of moving in any plane: up/down; right left; back forward.

If you see that the signal is excellent, tighten the nuts. But don't forget to check the polarizations. Scan transponders and check any channel broadcasting without payment, purely visually. Everything is okay?
Multifeed for satellite Amos 4w
Turn off all equipment again and twist the cable, as before, to the last converter. Then the setup process is repeated with some changes: the Amos 4w satellite and its operating frequency are selected in the receiver menu.

Having configured the multifeed, connect all three converters with the disk using the supplied short cables, in accordance with the attached figure.


In the receiver settings, you need to set the port parameters in accordance (set the following numbers in the Diseqc 1,1 menu: Sirius 2/Ku 4.8E - 1, Hotbird 13E - 2, Amos 4w - 3) with connecting the cables to the disk.
Then, automatically search for channels by satellite. If not all channels are found as a result of the search, then you should switch to the manual search mode and search for them by entering the parameters of the missing transponders.
Is it worth covering the disks from rain or moisture?
Of course, the disk is also an electronic device and runs on electricity, and if water gets in, a short circuit cannot be avoided. You'll be lucky if it's the only one that burns. Just a bag of tape won't help, it will only make the situation worse.
But a plastic bottle with the top cut off is another matter, simple and reliable. You can get creative and find a bottle or box of a suitable shape and seal the cracks with silicone or sealant.
Modern disk drives are already sold with a plastic protective casing included.

The disek must be installed in such a way that water does not reach the connection points through the cable. Therefore, it must be raised above the level of converters.
ANTENNA tuned to 3 satellites INSTALLED SUCCESSFULLY!
Installing a satellite dish and setting up a satellite dish for 3 satellites
Amos 4.0W
Astra 4A 4.8E
Hot Bird 13.0E
Installing one antenna and configuring it to receive channels from three satellites at the same time is the optimal solution, saving money and space.
Allows you to receive more than 100 Russian and Ukrainian free channels, as well as Italian, Polish and other channels.
To install an antenna on 3 satellites we need:

1 satellite dish
3 converters (heads)
2 side mounts for converters (multifeds)
1 diseqc switch
1 satellite receiver
as well as wire, f-connectors, tools...
Diagram of the location of the converters (heads).
As you can see, the central head of the antenna is aimed at the Astra 4A satellite (formerly Sirius); it is attached directly to the antenna.

Assembling the antenna, connecting the cable to the converter and switch.
THE CABLE MUST BE CONNECTED WITH THE RECEIVER TURNED OFF.
A short circuit in the cable may damage the receiver.
We attach two heads using multifeeds in an approximate position (as in the picture).
We attach the head that will receive Amos to the left of the center head(when viewed from the back of the antenna) at approximately 7 cm and slightly higher, then on the right is the head that will accept the Hot Bird it will be about 3 centimeters from the central head and slightly lower.

Diseqc switch.
We connect the cables from the heads to the diseqc switch. We write down which switch port (the ports are numbered) each satellite corresponds to. For example, we will connect a converter that receives a signal from the Amos satellite to the first port, Sirius to the third, Hot Bird to the fourth.

amos 1/4
sirius 3/4
hot bird 4/4
Receiver setup.
Now we need to configure the receiver according to our configuration. Since we could use a different number of heads and switches in the receiver settings, this data was not preset. We need to indicate that we are using one switch with four inputs; more precisely, we need to indicate to which switch inputs the heads are connected.
We go to the menu - press “MENU” on the remote control. Depending on the receiver model, there may be minor differences in the menu structure. We recommend using an already configured satellite receiver. Go to "MENU" - "INSTALLATION", select satellites one by one and set the parameter "DiSEqC

amos 1/4

sirius 3/4

hot bird 4/4

Signal search and antenna direction.
We configure the central head for the Astra 4A satellite.
When the antenna is installed, the cables are connected, the receiver is turned on - we turn the antenna and find satellite signals.
To make our task easier, we need to determine in advance the elevation angle of the satellite dish and the rotation angle.
On the website http://www.dishpointer.com/ you can find out the direction of the antenna and your geographic coordinates. You just need to enter the country, city, street, house and select the satellite of interest. Select 4.8E SIRIUS 4. We see the direction on the map, under the map you can find the coordinates of the area and the antenna elevation angle.
So first we need to set up the antenna for the satellite Astra 4A (formerly Sirius) - center head.
In the receiver menu, go to the Astra satellite or turn on one of the channels on the Astra satellite, for example “Rada” or “2+2”.

You should see two scales: the first shows the signal level, and the second its quality.
Antennas are adjusted on the lower “quality” scale. We slowly turn the antenna from right to left; if the signal cannot be found, we change the angle of inclination of the antenna a little and repeat the turns again. The signal level should be about 70. We secure the antenna tightly. Half the work is done!
We repeat the operation with the left head (Amos). We configure, for example, the “1+1” or “New Channel” channel. Now we are unable to move the antenna; we change the position of the head using multifeed mounts. We strive to ensure that the signal quality is greater than 70.
At the final stage, we set up the Hot Bird (right head). You can tune to the channels “1TVRUS”, “RTR”... The signal quality on this satellite can be adjusted to more than 70. When the adjustment with the mount has brought the maximum result, we rotate the converter around its axis and achieve the maximum signal from this satellite.
If you have any questions, write on the forum in the topic: Setting up an antenna for 3 Amos Astra HotBird satellites
We will be happy to try to help you.
We also recommend
 Installation and self-tuning of the tricolor TV antenna for satellite Assembling the antenna connecting the cable to the converter and switch
 Setting up a router via a mobile Wifi modem with 3g support
 How to choose an external battery: overview of characteristics and step-by-step selection instructions
 Standard Windows tool for remote access via RDP within a local network
 End-to-end connection: how to connect a smartphone to the Internet via a computer Connecting the Internet to a computer via a phone
 Ladoshka service from Sberbank Check the balance of the Ladoshka school meal card