Utilities for testing RAM. How to check the status of your computer's RAM
The Windows 10 64-bit RAM test is carried out at the POST stage. That is, even when the PC starts. Checking the RAM shows that the system can load its processes there. Otherwise, various failures are possible, and no self-respecting manufacturer will allow this to happen. Therefore, Windows 10 also has its own tools to perform the same actions. The only exception to this rule is virtual machines, which have no reason to run POST tests. The logic is simple: if someone launched a copy of the system, then the PC is, of course, operational.
Third-party sites, one of the most famous is memtest.org, distribute third-party utilities. This comes in handy from time to time. Usually a programmer tries traditional methods, sees what exactly he doesn’t like, and then creates his own software and sometimes even tries to sell it. There are hundreds and even thousands of examples of this. What is good about checking memory with third-party utilities? You can't tell unless you try.
POST test
By default, the POST test starts every time you start your PC. But many people don’t like that it takes time and disable checking through the BIOS. As a result, the system boots faster and the RAM is less loaded. Consistent adherence to this policy may result in blue screens. When one of the RAM lines fails. Make sure it is not in the BIOS of the virtual machines.
There is no choice on most laptops either. Many modern PCs do not have it either (the ability to turn off the scan). If required:
- Go to the Advanced BIOS section.
- Look for a setting with a name like Quick Power on Self Test.
- Setting this option to Enable disables the boot check.
In modern boards you can operate with fast loading. For the most part, this option overrides the POST test, and with it the memory check.
Built-in tools

Then the OS will boot. Based on the results of the inspection, actions are taken to replace the rulers. It’s not difficult to select the one you need, so we won’t dwell on this (take it one by one if you don’t know any other way). After loading, you will receive another message (in case the master went out for coffee).

This will finally show what exactly needs to be done.
Note! The same snap-in opens when you search for “memory checker” or through the Run tool (Win + R) by typing mdsched.
Third party utilities
Download the image from memtest86.com and go!

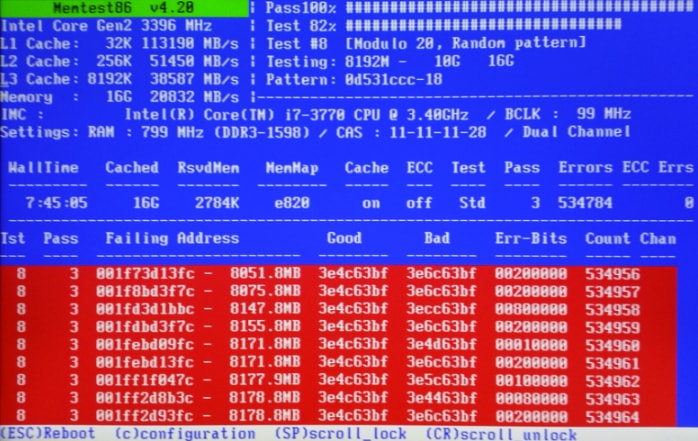
How does the utility work? It writes a pattern to the specified address and then tries to read it. In this case it is ffffdfff, and on the second pass it is a different number.

There are many options for how to reliably check every bit of RAM. Please note that the utility is aware of processor caches. She indicated their sizes and speed of circulation:
- L1 Cache size 64 K.
- L2 Cache size 256 K.
- L3 Cache size 6 MB.
The authors always believed that the speed should consistently drop, but the screenshot shows something different. Live and learn. Meanwhile, the software went on to write the 00000000 pattern to check for any stuck bits. The software can work indefinitely, but at some point it will write what exactly needs to be done next.

In our case, there is no need to do anything, since the RAM is fine. Press Esc to exit the utility interface. The only downside is that the bootloader does not have a skip option, so you need to go to the BIOS again and disable booting from DVD there, or remove the USB flash drive. It depends on what media the work is coming from.
View result
If for some reason the program has completed testing, but the result could not be verified (colleagues/family/laziness interfered), use system messages.

What to check
Since the tests are free, it makes no difference which one tests RAM. Under DOS there is little difference whether 32-bit or 64-bit commands are used. Therefore, even the system checks the memory for errors during the boot period.
This memory works very quickly, allowing the processor to read the necessary information almost without pause. What the RAM contains, of course, is available only when the computer is already turned on, and before you press, for example, the reset button. When the PC is turned off, all data not saved in advance is automatically erased. Don't forget about this and always save what you work on!
For this purpose, there are so-called storage hard drives, as well as other storage devices that store data permanently. And when you turn on the power of the PC again, you can again launch the saved information into the RAM.
The amount of RAM (this is the second name for “RAM”, that is, random access memory) also regulates the number of tasks that a computer can carry out simultaneously.
The definition of RAM refers not only to the chips themselves, which represent the basis of the device of this memory in a computer system, but also to the logical display and placement. This refers, respectively, to the way in which memory addresses are represented on the chips, and the arrangement of data and commands at known memory addresses of the entire system.
Sometimes the definition “volatile memory” is also used. It's not hard to understand where it comes from: unsaved data is lost when the computer is disconnected from the network. Therefore, sometimes some applications create “in reserve” backup copies of the data they use.
Saving the data you are working with is very simple: any program has a “Save” function, which can be easily found in the options panel. This function is also duplicated by pressing the “Ctrl” and “S” keyboard buttons. After this command, your file is transferred to your hard drive and saved.
The chips that represent RAM are usually connected directly to the motherboard. They may differ in characteristics, therefore, for normal operation, these microcircuits must be normally compatible with the system on which they are installed.
The presence of annoying RAM errors can be suspected if the computer is seriously malfunctioning: frequent “freezes” interfere with work and are annoying, the scary blue “screen of death” regularly appears, and programs crash. There is already a reason to say that there is something wrong with the RAM and check it for errors.
The reasons for such errors are simple:
- New memory modules have been added;
- The memory simply failed;
- The fact of memory overclocking;
- A number of other reasons.
To reliably check memory for errors, special utilities have been developed. "Memtest86+" is one of them. However, if you have new Windows_7 systems or a version of Vista installed on your PC, the memory can also be checked using the built-in diagnostic tool built into the Windows environment.
Using the built-in diagnostic tool
Step one - turn on your PC, find “Start” in the lower left corner of the screen, click the cursor in the search bar and enter “mdsched.exe” in it.
You will be presented with the program “mdsched”, to run it simply press “Enter”.
If you are interested in the first, immediate option, close (saving the necessary information!) all programs you have open, and then click “Reboot and scan /recommended/”. Your PC will immediately reboot and the memory diagnostic will begin running.
You will learn about detected memory errors from the inscriptions on the screen.
To launch additional parameters for checking the RAM, you can press the “F1” button on the keyboard, but, as a rule, if there are errors, they will be successfully identified when using the standard settings.
Diagnostics can also be run when the operating system starts. When you see the Windows boot manager, press the Tab key on your keyboard (it's in the third row from the top on the left) and select Memory Diagnostics. It will start immediately.
As for the Memtest86+ utility, it will help you out if you are working on any other operating system. When downloading it from the website http://www.memtest.org/, select one of the utility options.
To use it, first extract the ISO image from the downloaded archive, then burn it to disk. When you start your computer, you will need to boot from this disk. For this to happen as it should, you need to check in the BIOS that the first boot device has been set to “CD-ROM”.
When your computer starts, the utility should boot successfully and start working.
In operation, it will show you all the information about computer memory, the processor, and the chipset. The active memory test process will be visible in the display in the upper right area of the screen.
To somehow change the settings, select additional parameters for testing memory, you need to press “C”, and to exit – “ESC”.
Problems associated with RAM are very diverse. Has your computer stopped turning on? One of the likely culprits is the RAM. Ripples on the screen? Perhaps she too. Programs won't start, files won't open? And here we couldn’t do without her. What can we say about blue screens of death (BSoD), because this is the most important symptom of a RAM malfunction. Let's talk about what causes RAM failures and how to check it for errors.
If the failure appears immediately after installing a new RAM module on the computer, it may be caused by:
- Incomplete installation of memory into the slot.
- Oxidation of the surface of the contact ridge of the memory strip due to long-term storage. Oxidized contacts usually appear dull and darkened.
- Incompatibility of RAM modules with each other (if there are several of them) or with the processor (chipset on older PCs), more precisely, with the memory controller built into them.
- Inoperability of the new module due to manufacturing defects.
- A faulty RAM slot on the motherboard.
What to do to diagnose and fix the problem:
- Check that the memory is installed correctly in the slots. The side fastenings must be latched.
- To remove the oxide layer from metal contacts, carefully clean them with a school eraser.
- Install the bracket in the adjacent slot (if available).
- Reset your computer's BIOS to default settings.
- To avoid incompatibility of memory modules, try starting the computer with only one of them, as well as with several in different combinations.
- Update the BIOS using a known good and suitable memory stick.

The cause of a RAM failure that occurs after the computer has been operating normally for some time may be:
- Changing the timings and frequency of RAM in the BIOS, installing an inappropriate XMP profile, overclocking.
- The bracket falls out of the slot (often found on laptops).
- Oxidation of contacts.
- Factory defects (sometimes they make themselves felt after months of using the device), degradation.
- Mechanical or electrical failure of memory subsystem components.
What can be done:
- Make sure the module is installed correctly in the slot.
- Reset BIOS settings to default.
- Remove the module from the slot and clean the contact comb with a rubber band.
- Check your memory for errors using special programs. This is exactly what we will talk about next.
Checking memory for errors using programs
- Turn on the computer at least half an hour before testing to “warm up” the unit and power circuits.
- Test under the same conditions that cause the failure.
- If your computer has multiple memory modules installed, test the entire set the first time you run the test program. If errors are detected, repeat testing each strip separately.
The average duration of a full verification cycle is 6-8 hours, the number of passes (repetitions of test sets) is 8-15. As practice shows, the bulk of errors are detected already on the first or second pass, but some are detected only after repeated passes. If errors are found, further checking may not be carried out.
How to interpret the results
Even one detected error indicates a potential RAM failure. However, this is not a reason to immediately throw it in the trash. Sometimes errors are caused by something that interacts with the memory, such as a faulty slot, a power supply failure, or a defect in the data lines. Often the memory is “buggy” due to poorly selected timings and frequencies. To make the errors disappear, just return it to its default settings.
Windows Memory Checker
Sometimes you hear that the RAM checker built into Windows cannot be trusted. It supposedly never reveals anything. This is a false statement: if the program is configured correctly, its results are no less reliable than those of specialized utilities, which will be discussed below.
So, to launch the built-in Windows memory checker, save the open documents and enter the name of the utility in the system search bar - mdsched. Select it from the list of found ones.

After clicking on the first item in this window, the computer will reboot and the scan tool will begin its work. Unfortunately, by default it is not configured optimally. To stop the current test and go to the utility settings, press the F1 key.
The screenshot below shows the parameters that should be set:
- The range of tests is wide.
- Cache (processor memory) is disabled.
- The number of passes is 8-15.
To move to each subsequent item, press the Tab key.

To save the settings and start the testing process, press F10.
The list of errors found is displayed directly on the screen - in the “Status” field, but there is no need to monitor the program’s operation and continuously look at the monitor. Once the scan is complete, the computer will restart and a message about the results will appear on your desktop.
GoldMemory
The GoldMemory PC RAM testing utility is considered one of the best in its class. It is built on non-standard algorithms that can catch errors that competing applications miss. It provides full support for 64-bit architecture and compatibility with all types of legacy and modern RAM, including the DDR4 generation. The maximum amount of memory tested is 64 GB/1 TB.
GoldMemory operates in three main scanning modes - fast, normal and in-depth, as well as a custom one, where the testing duration and sets of test groups are set manually. In addition, the program saves history, maintains reports and supports management using batch files.

Unfortunately, GoldMemory is a paid product intended for commercial use. The 30-day demo version, available for free download, has significant limitations and does not allow you to evaluate all the functionality of the program.
Checking RAM using GoldMemory is carried out outside the operating system, more precisely, in DOS mode. That is, before using the program, you must write it to a flash drive, floppy disk or CD/DVD from which you will boot the computer. Ready-made images for recording on removable media are posted on the official website. There are also brief instructions on how to use the utility.

After booting the PC from the drive on which GoldMemory is recorded, testing begins automatically. Errors found are recorded in reports and displayed in the program interface with red symbols.
Memtest86
The Memtest86 memory tester has a 20-year history of development behind it. This is perhaps the most famous product in its class, which has become a kind of standard towards which developers of competing applications are guided. Unlike GoldMemory, Memtest86 has a free, fully functional version for home users. The paid editions (yes, they exist) also include several advanced tests, reporting support, and configuration file management.

Memtest86 is even easier to use than both tools described above. The free edition is optimally configured by default, so the user just needs to run the scan and glance at the screen from time to time. Errors found are also displayed in red.
Memtest86, like GoldMemory, runs from bootable media. Ready-made images for transferring the utility to an optical disk or USB flash drive are available for download on the official website. By the way, in the archive with the program there are instructions for its use in English.
At the end of the article, I cannot help but mention another tool that was once very popular. This is Memtest86+. The utility is very close in structure to Memtest86 and is based on the same technologies, but is currently hopelessly outdated, since it has ceased development since 2013.
23162Random access memory (RAM) is a critical component on which not only the speed of the computer depends. Severe memory corruption will most likely result in the system being unable to boot and the user receiving a Blue Screen of Death with an associated error code. Minor defects in the memory module can cause crashes and long freezes when working with resource-intensive software, periodic BSOD appearances, and computer reboots on their own.
Memory problems can also be indicated by a progressive decline in computer performance that cannot be corrected by standard cleaning and optimization methods. To eliminate possible errors in RAM, it is necessary to test it. This can be done using special utilities or using the operating system itself. The second method is more suitable for novice users, since most professional RAM testing tools are too complex to master.
You can run the standard memory diagnostic utility in Windows 8 and 8.1 as follows. Open standard search and enter the command Windows Memory Diagnostic (in Russian Diagnosis of RAM problems), and then run the component.

The same can be done with one single command executed in the CMD console or the Run window.

A small window will appear in which you will be prompted to reboot the system.

There is another way to run the memory testing module, but you are unlikely to find it convenient. In a command prompt running as an administrator, you need to run the command bcdedit /displayorder (memdiag) /addlast and then restart the computer.

A menu will open in which you can specify the required action.

The disadvantage of this method is that testing will be launched every time you reboot and to disable the check you will need to run another command - bcdedit /displayorder (memdiag) /remove . On the other hand, this will allow you to quickly launch the diagnostic module when booting from a boot or rescue disk.
So, after rebooting, you will see a blue screen with a standard set of RAM tests.

The default set is Standard. By pressing the F1 key you can select another set - Basic or Extended. Once the diagnostics are complete, the computer will reboot and a message with preliminary test results will be displayed in the notification area.

For more detailed information, open the Windows Event Log (with the command )

Random access memory or RAM is one of the most important components of a personal computer. Malfunction of modules can lead to critical errors in system operation and cause BSODs (blue screens of death).
In this article, we will look at several programs that can analyze RAM and identify faulty modules.
GoldMemory is a program supplied as a bootable image with the distribution. Works without the participation of the operating system when booting from a disk or other media.

The software includes several memory test modes, can test performance, and saves test data to a special file on the hard drive.
MemTest86
Another utility that is distributed already written into an image and works without loading the OS. Allows you to select test options and displays information about the size of the processor cache and memory. The main difference from GoldMemory is that there is no way to save test history for later analysis.

MemTest86+
MemTest86+ is a revised edition of the previous program, created by enthusiasts. It features higher testing speed and support for the latest hardware.
Windows Memory Diagnostic Utility
Another representative of console utilities that work without the participation of the operating system. Developed by Microsoft, Windows Memory Diagnostic Utility is one of the most effective solutions for identifying RAM errors and is guaranteed to be compatible with Windows 7, as well as newer and older systems from MS.

RightMark Memory Analyzer
This software already has its own graphical interface and runs on Windows. The main distinguishing feature of RightMark Memory Analyzer is the priority setting, which makes it possible to check RAM without loading the system.

MEMTEST
A very small program. The free version can only check the specified amount of memory. In paid editions, it has advanced functions for displaying information, as well as the ability to create bootable media.

MemTach
MemTach is professional-level memory testing software. Conducts many tests of RAM performance in various operations. Due to some features, it is not suitable for the average user, since the purpose of some tests is known only to specialists or advanced users.

SuperRam
This program is multifunctional. It includes a RAM performance testing module and a resource monitor. The main function of SuperRam is RAM optimization. The software scans memory in real time and frees up space not currently being used by the processor. In the settings you can set the limits at which this option will be enabled.

Errors in RAM can and should cause problems with the operating system and the computer as a whole. If you suspect that the cause of the failure is the RAM, then you need to test using one of the programs given above. If errors are detected, sadly, you will have to replace the faulty modules.
We also recommend
 ivi subscription from MTS - connection and disconnection
 How to improve your skill in CS:GO Skill training in cs
 How to connect the Internet from the Tele2 operator to your phone
 Internet package XS from the operator Megafon
 Digital television receiver BBK SMP137HDT2 How to turn on the music center without a remote control
 Manufacturing high-quality printed circuit boards using thermal transfer paper using the LUT method